Spicy Peri-Peri Style Sauce
Hot sauce lovers, this one’s for you!! This peri-peri inspired sauce is bold, fiery, and ridiculously versatile — use it on chicken, fish, roasted veggies, as a dip, on eggs (seriously, I’ve put this on everything).
I say peri-peri style because it’s not a strict traditional recipe; the biggest tweaks are the addition of BBQ sauce and my use of scotch bonnet chillies instead of African bird’s eye chillies. This version really leans into deep roasted flavours, BBQ richness, and scotch bonnet heat for a fruity, well-balanced kick.
Ingredients (makes about 1.5L of sauce)
For the Roasted Vegetable Base:
80g spring onions (remove any green wilted bits, peel back any tough layers, and chop)
230g red + white onions (roughly 2 medium-small red onions + 2 medium-small white onions, quartered)
450g red bell peppers (about 4 medium-large, deseeded and halved)
25g fresh ginger (peeled and chopped)
30–50g Scotch bonnet peppers (change depends on spice tolerance; remove stems but keep seeds for heat, I used 50g)
200g tomatoes (deseeded, to balance the spice)
105-140g garlic cloves (depends on how garlicky you like your sauce, I love garlic so used 140g; it’s about 3-4 full bulbs and I use pre-peeled frozen ones, I hate peeling fresh garlic)
1 tsp whole black peppercorns
½ tsp Italian seasoning
½ tsp chili flakes
2 limes or 2 lemons, halved
2 tbsp sunflower oil (to coat all the vegetables)
For the Liquid Base:
100ml water
50ml sunflower oil
50ml olive oil
50ml white vinegar
Juice of 1 lime or 1 lemon
1 heaped tsp sugar
1 heaped tsp salt
BBQ Mix:
4 tbsp BBQ sauce
3 tbsp ketchup
3–4 tbsp light soy sauce
1 tbsp hot chilli flakes
2 tsp mixed herbs
60ml tropical fruit juice (mango, pineapple, etc. for sweetness)
Finishing Touches:
30g fresh coriander (cilantro), including stems (adds a final burst of flavour)
Step-by-Step Instructions
Step 1: Prep & Roast the Veggies
Preheat your oven to 210°C. If using an air fryer, set it to 210°C as well.
Prepare a baking tray by lining it with a tinfoil and drizzle thin layer of sunflower oil on top.
Prep the vegetables and add them to the tray:
Remove any tough outer layers from the spring onions and chop them.
Quarter the red and white onions.
Halve and de-seed the red bell peppers.
Peel and roughly chop the ginger.
Remove the stems from the Scotch bonnets (leave the seeds for extra heat).
Halve the limes or lemons (don’t squeeze them yet — this will happen after roasting).
Coat everything in oil. Place the vegetables on the tray and drizzle a little more oil over the top.
Add mixed herbs, chilli flakes, black peppercorns, salt and sugar on top then massage everything with a little more oil to ensure even roasting.
Roast at 210°C for 15 minutes. Then, increase the heat to 230°C and roast for another 5 minutes or until the peppers have slight charring. (Charred, not burnt! We want flavour, not bitterness.)

Step 2: Prepare the Liquid Bases
While the veggies are roasting, mix together the following in a bowl:
100ml water
50ml sunflower oil + 50ml olive oil
50ml white vinegar
Juice of 1 lemon or 1 lime

2. Stir in 1 heaped tsp of sugar and 1 heaped tsp of salt until dissolved. This will balance acidity and enhance the flavours.
3. In another small bowl, combine:
4 tbsp BBQ sauce
3 tbsp ketchup
3-4 tbsp light soy sauce
1 tbsp chilli flakes + ½ tsp mixed herbs
60ml tropical fruit juice
Stir well and set aside.
Step 3: Blend the Base
Add all the roasted vegetables to a blender, EXCEPT the lemons/limes.
Squeeze out the juice from the roasted limes/lemons into the blender — DO NOT blend the whole fruit, as the rind will make the sauce too bitter.
Blend the veggies until roughly combined. If your blender struggles, add ¼ cup of water to help.

Step 4: Incorporate the Liquid Bases
Pour in ⅓ of the oil-vinegar mixture and blend for 3 minutes.
Add another ⅓, blend another 3 minutes.
Add the final ⅓ and blend until smooth.
Once smooth, add the BBQ mix and blend again for another 3 minutes.
Keep blending. When you think you’ve blended enough, blend for another minute. The sauce should be completely smooth, with no visible chunks.

Step 5: Adjust the Flavour
This is the most important step because no two batches of this sauce will ever taste exactly the same. The flavour depends on the freshness, ripeness, and quality of your ingredients, which is why you must taste as you go and tweak accordingly. Don't expect the sauce to be perfect straight out of the blender, this is where you fine-tune it to your exact preferences. This is how I fix common flavour imbalances:
Too Tart? (Overpowering tangy/sour taste from vinegar or citrus)
Add more BBQ sauce for a sweeter balance.
Stir in 1 tsp of honey or sugar at a time, blending and tasting after each addition. Don’t dump in too much at once, you want to subtly round out the acidity, not turn it into a dessert.
If the citrus is just slightly too sharp, let the sauce rest overnight. Acidity mellows over time.
Too Salty? (Overpowering saltiness that drowns out other flavours)
First, try adding a little more BBQ sauce, as it has both sweetness and body to counteract salt.
Add more acid (vinegar or citrus juice), it sounds counterintuitive, but acid can actually balance excess salt by brightening other flavours.
If the saltiness is still too much, drizzle in more olive oil, fat helps coat your tongue and soften harsh flavours.
If it’s still overpowering, blend in more roasted red peppers or tomatoes to dilute the salt concentration without sacrificing flavour.
Too Spicy? (Scotch bonnets hit you harder than expected)
Stir in tomato purée or passata, tomatoes naturally tone down heat while keeping the sauce rich.
If it’s still fiery, add a bit more BBQ sauce or fruit juice, both help mellow heat with sweetness.
Worst case? Serve with a cooling side (like yogurt or sour cream) if you’ve gone past your spice tolerance.
Too Thick? (Blender struggling or sauce too gloopy)
Add water, a tablespoon at a time, blending after each addition until it reaches your preferred consistency.
For extra richness, replace water with a bit more oil or fruit juice, this keeps the flavour intact while thinning it out.
Keep in mind that the sauce will thicken slightly in the fridge, so it’s okay if it looks a little looser than expected while blending.
The beauty and frustration of using fresh vegetables is that their flavour is unpredictable. A perfectly ripe, juicy tomato from a market will taste completely different from a bland, out-of-season supermarket tomato. That’s why buying from local markets is always your best bet.
If your sauce feels flat, it honestly might not be a seasoning issue, it could just be that your ingredients weren’t as flavourful as they should be. That’s why tasting at every stage is key. Don’t just follow measurements blindly; trust your taste buds and adjust as needed.
Step 6: Final Blend with Fresh Coriander
Once blended to your liking, add 30g fresh coriander (cilantro) — including the stems (that’s where the flavour is). Blend again until completely smooth.
Taste, tweak, and adjust again if necessary.

Step 7: Store and Let It Rest
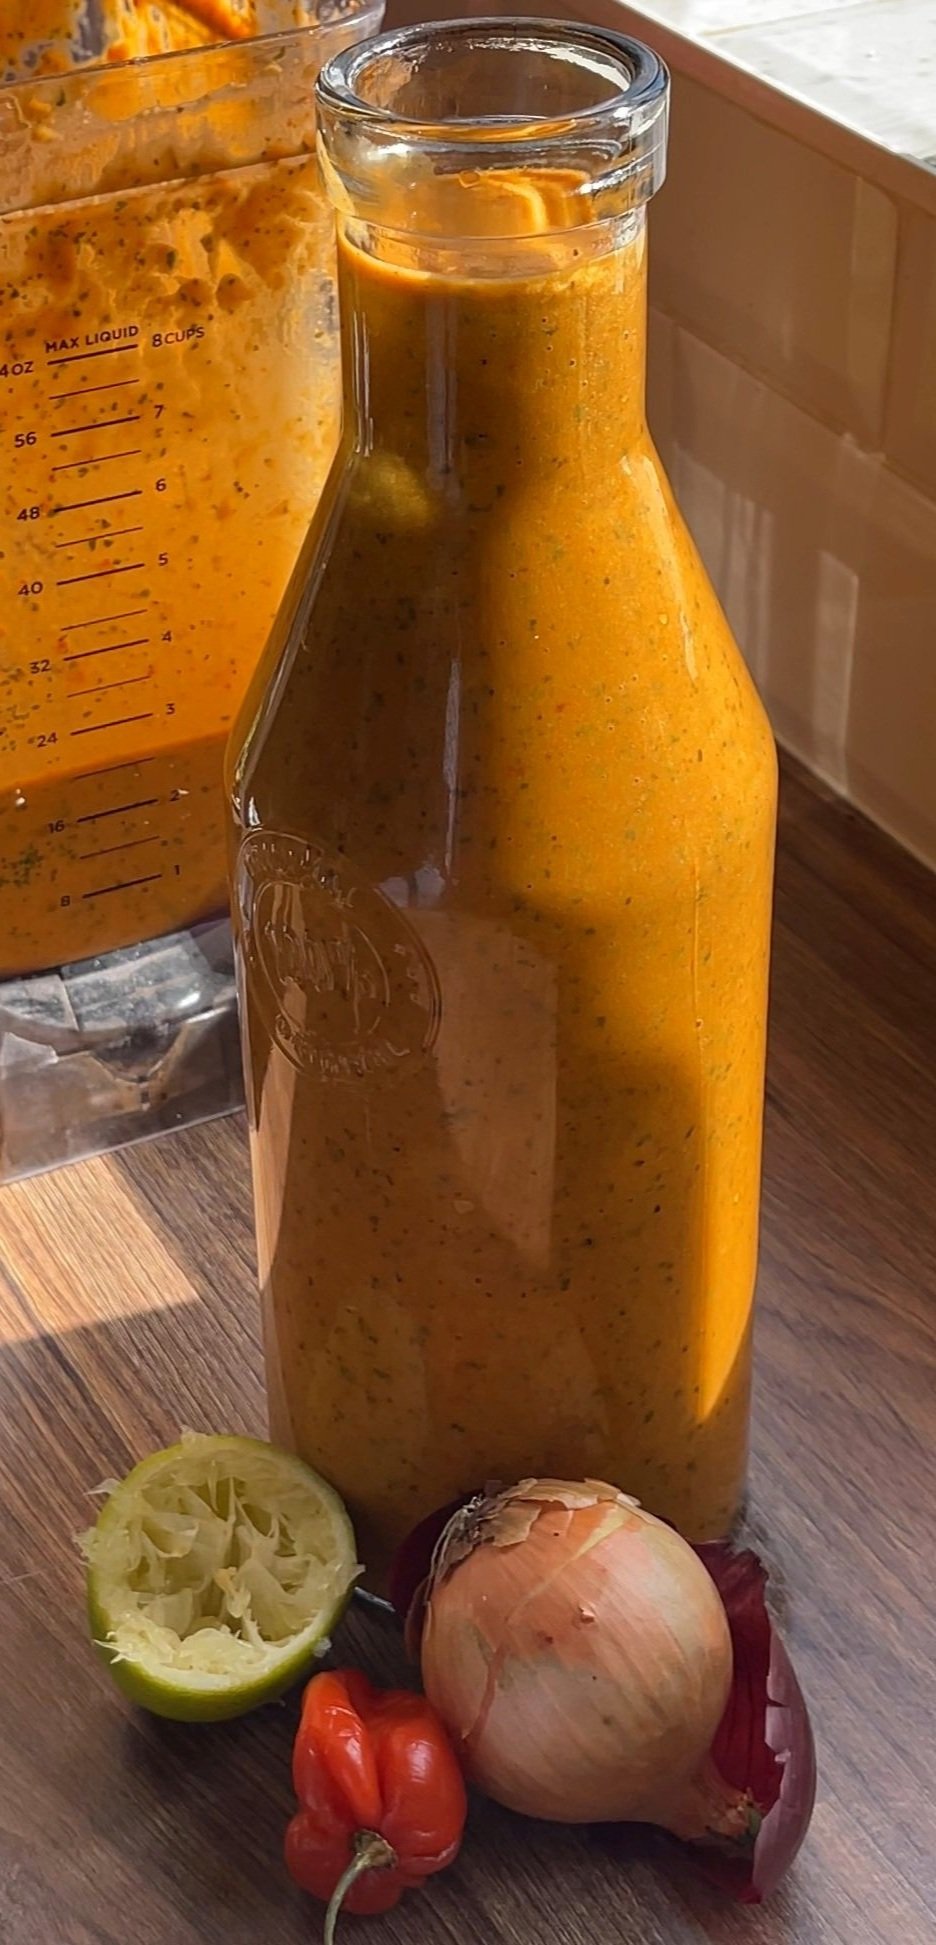
Pour into a clean, airtight bottle or jar. Let it rest in the fridge for at least 12 hours before using. It always tastes better the next day once the flavours have mingled, and I’ve found that 48 hours later the sauce starts tasting the best.
It keeps in the fridge for up to 2 weeks, but let’s be real — it won’t last that long.

FAQ & Troubleshooting
Is this a peri-peri sauce?
Yes and no. This sauce is inspired by traditional peri-peri sauce, but I’ve made a couple tweaks. I’ve swapped African bird’s eye chilies for Scotch bonnets (less expensive and more widely avaiable where I am) and adding BBQ sauce for a smokier depth. It still has that signature heat, tang, and richness, but with my own twist. If you’re looking for something close to authentic peri-peri, this will still hit the spot.
What can I use this “peri-peri” sauce for?
Literally everything. Brush it onto grilled meats, use it as a dipping sauce, slather it on roasted veggies, drizzle it over rice, toss it with pasta, this sauce doesn’t discriminate. I personally looove using it for corn, see the recipe here!
Who invented peri-peri sauce?
Peri-peri sauce originates from Mozambique and Angola, created by the indigenous people who later incorporated Portuguese flavours after colonisation. The Portuguese introduced vinegar and garlic to the mix, and over time, the sauce evolved into what we now know as peri-peri, especially popularised by South African Portuguese-style chicken restaurants (yes, including the famous one you’re thinking of).
Can this “peri-peri” sauce be used as a marinade?
1000% YES. The citrus and hot peppers both tenderise and deeply infuse meats with flavour. If you’re grilling chicken, beef, fish, or even tofu, marinating with this sauce will take your food to another level. Just coat, refrigerate for a few hours (or overnight if you’re patient), and then cook as usual.
What does this “peri-peri” sauce taste like?
Spicy, smoky, tangy, fruity, and deeply flavourful. The roasted bell pepper bring out a natural earthy sweetness, all the citrus adds an interesting sharp zing, and the Scotch bonnet gives it an amazing slow-building, satisfying heat.
How spicy is this “peri-peri” sauce?
This sauce is hot, but the level of spice depends on your tolerance. As a Nigerian Yoruba girl, my spice tolerance is pretty damn high LOL, so this feels more like a pleasant kick than an unbearable burn. If you’re used to spicy food, you’ll find it bold but manageable. If you’re not, be warned. It might catch you off guard. You can always reduce the number of Scotch bonnets or blend in more tomatoes to tone it down.
Is this “peri-peri” sauce recipe vegan?
Yes! It’s 100% plant-based, with no animal products or dairy.
Thank you so much for reading! If you have any questions at all — about this recipe, how to tweak it to your taste, or even just to chat about food — I’d love to hear from you. Drop a comment below, DM me, or send me an email anytime.