The BEST Black Bean Brownies

These brownies are insanely fudgy, rich, and secretly packed with fibre. No, you won’t taste the beans.
Let’s get the obvious out of the way: yes, these brownies have black beans in them. No, they won’t taste like beans. What they will taste like is the richest, fudgiest, most satisfying brownies you’ve ever made - all while sneaking in extra x6 fibre and protein. Trust the process.
Follow every step exactly, and you’ll be rewarded with the best brownies you’ve ever made — black beans or not.
Ingredients (fills a 6×8-inch tin)
60g self-raising flour
30g cocoa powder
75g date paste (or 105g homemade, blended dates smooth with a little water)
1 tsp molasses (optional, for depth)
50g sugar
1 large egg + 1 egg yolk
70g browned butter (see below for instructions)
35g neutral oil (e.g. vegetable oil, sunflower oil, avocado oil)
226g black beans, drained and rinsed
¼ tsp salt
½ tsp espresso powder (optional, for depth)
¼ tsp cinnamon
200g milk chocolate, melted
1 tsp vanilla extract
Handful of chocolate chips
Step-by-Step Instructions
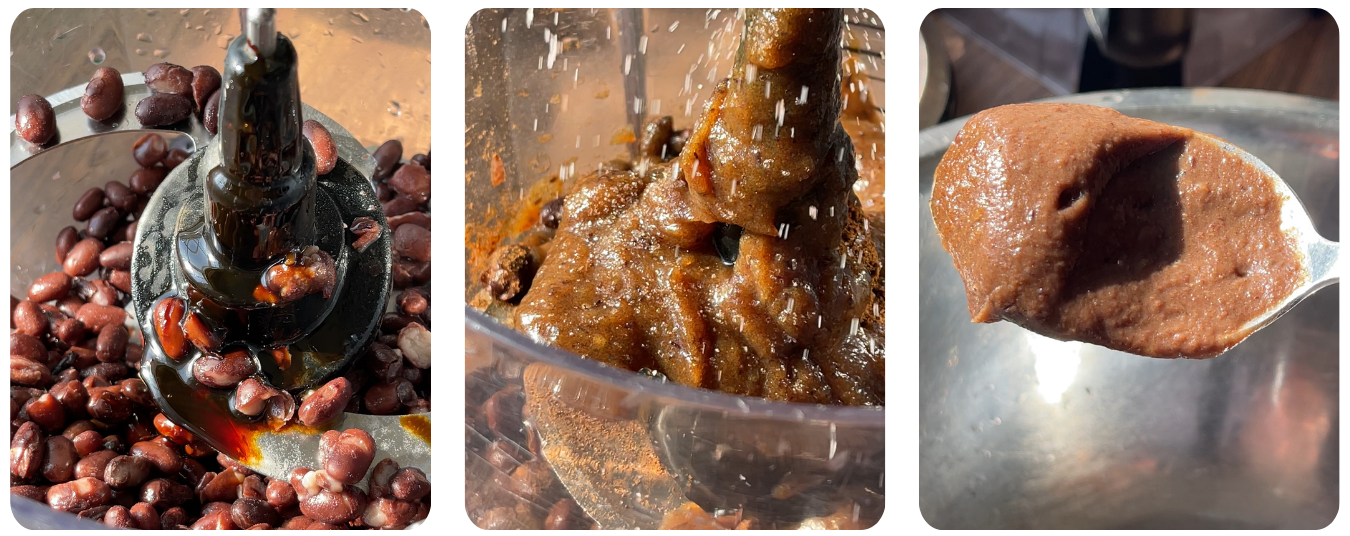
Step 1: Blend the Beans and Dates
In a blender or food processor, combine:
Black beans
Date paste
Molasses (if using)
Espresso powder
Salt
Cinnamon
Blend until completely smooth. If it’s too thick to blend properly, add up to 25ml of water, 1 teaspoon at a time — just enough to loosen it into a creamy consistency. This step is key for making sure there’s no trace of beans in the final brownies.
Step 2: Brown the Butter
Place the unsalted butter in a small saucepan over medium low heat.
Stir constantly as it melts, foams, and turns golden brown.
Once you see brown flecks at the bottom and smell a nutty aroma, remove it from the heat immediately.

4. Let it cool for 10 minutes before using. If it’s too hot, it can scramble the eggs in the batter.
Step 3: Melt the Chocolate
Chop the chocolate into small pieces (if using a bar).
Place in a microwave-safe bowl and heat in 20-second bursts, stirring after each, until smooth and fully melted.
Stir the cooled brown butter and oil into the melted chocolate until completely combined.

Step 4: Whisk the Eggs and Sugar
In a large mixing bowl, add the egg, egg yolk and sugar.
Whisk vigorously with a hand whisk for 2–3 minutes until pale and fluffy.
The mixture should be visibly lighter in colour and foamy.

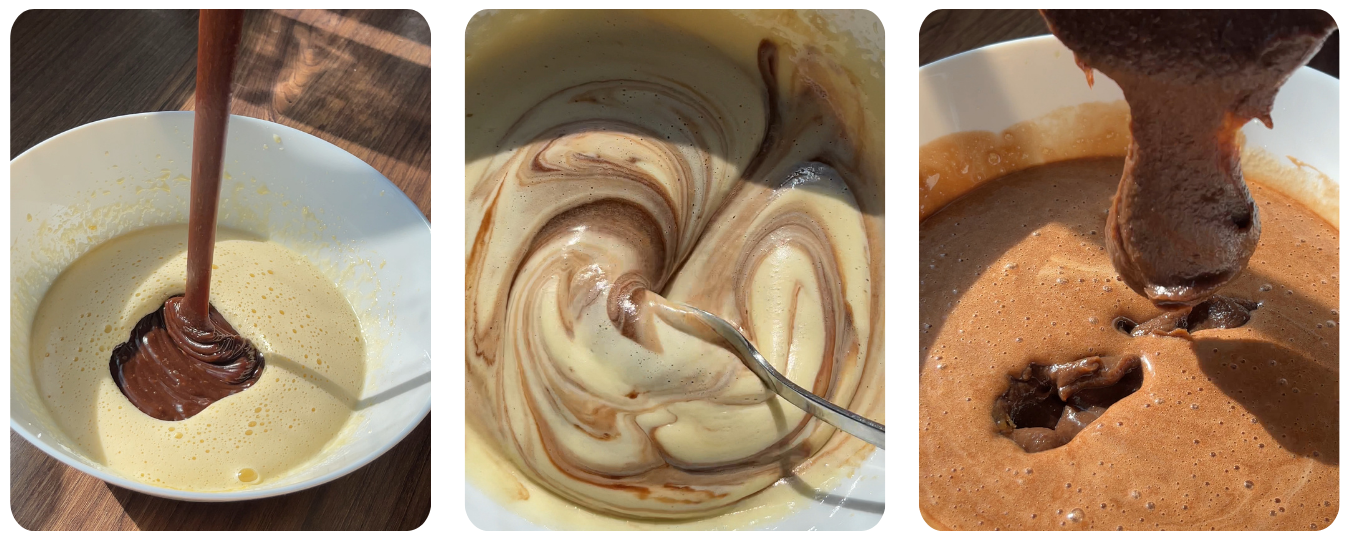
Step 5: Combine Wet Ingredients
Slowly fold in the melted chocolate mixture into the whisked egg mixture.
Once combined, whisk in the blended black bean mixture until smooth.
At this stage, the batter will be thick and glossy, which is exactly what you want!
Step 6: Combine Everything
Sift together the flour and cocoa powder.
Gently fold the dry, sifted ingredients into the wet batter just until combined. Don’t overmix - this will make the brownies tough instead of fudgy. If you’re adding extra chocolate chips, stir them in at this stage.

Step 7: Bake!
Pour the batter into a lined 6×8-inch tin and smooth the top. For an extra finishing touch, sprinkle additional chocolate chips and a light dusting of sea salt on top.
At this point, I highly recommend chilling the batter in the tin for at least 30 minutes before baking. This extra step enhances the fudginess and allows the flavours to develop even more. If you can wait, it’s worth it.
When ready to bake, preheat the oven to 175°C (350°F) and bake for 22–25 minutes. The edges should be set while the centre remains slightly underbaked, which ensures the brownies stay moist and fudgy.

Step 8: Cool and Slice
Let the brownies cool in the tin for at least 30 minutes after baking before you slice. For extra chewiness, refrigerate them before cutting.
FAQ & Troubleshooting
Will these bean brownies taste like beans?
I was skeptical too, but I swear they don’t. The black beans just add moisture and structure without any noticeable flavour. However, taste perception varies — my dad sniffed out the beans immediately (he suspected it was there, but didn’t actually taste them), but the rest of my family, who don’t eat enough vegetables to know better LOL, had no clue. If you’re worried, ensure you’ve blended the beans and date paste until super silky smooth, and you can even reduce the beans by half if you're extra cautious.
Are these bean brownies healthy?
Not really. They still have a good amount of butter, sugar, and chocolate, so let’s not pretend they’re a superfood. However, they are healthier than regular brownies, higher in protein, fibre, and nutrients while being slightly lower in calories. Think of them as a more balanced treat, not diet food.
Can I use a different bean?
No. Stick with black beans. Other beans (looking at you, kidney beans) have stronger, earthier flavours that don’t disappear as well. If you want a neutral-tasting brownie, black beans are the way to go.
I don’t like date paste. Can I swap it?
I hear you. I don’t love date paste either, but trust me, it’s only there for structure and sweetness. No weird fruity aftertaste, just smooth, slightly caramel-like richness. If you’re still not sold, you can swap it for honey, maple syrup, or just extra sugar, but it might change the texture.
My brownies came out dry. What happened?
Overbaking is the most likely culprit. Take them out when the centre still looks slightly soft, they will firm up as they cool. Also, make sure you’re measuring your flour correctly and don’t skip the brown butter and oil, they’re there for the moisture.
They’re not fudgy enough for me! Any tips?
Refrigerate the batter for 2 hours before baking. This allows the flavours to meld and results in a denser, chewier texture.
Refrigerate the brownies for at least 2 hours after baking. Sounds annoying, but it sets them perfectly and enhances the texture.
Slightly underbake them. The centre should still look a little soft when you take them out.
Can I make them dairy-free?
Yep! Swap out the brown butter for coconut oil or a good vegan butter substitute and use vegan chocolate. The texture might change slightly, but they’ll still be delicious.
How do I store them?
Because these brownies contain beans, they need to be kept in the fridge at all times to prevent bacterial growth.
Fridge (up to a week): Store in an airtight container. Keeping them cold makes them extra chewy and fudgy.
Freezer (up to 3 months): Wrap individual brownies tightly in cling film or foil, then store them in an airtight container. When ready to eat, microwave for 15–20 seconds or let them thaw at room temp.
Do not store at room temperature. Beans + warmth = potential food safety risk.
<script type="application/ld+json">
{
  "@context": "https://schema.org/",
  "@type": "Recipe",
  "name": "The BEST Black Bean Brownies",
  "description": "These brownies are insanely fudgy, rich, and secretly packed with fibre. No, you won’t taste the beans! Made with browned butter and melted chocolate for ultimate decadence.",
  "image": "https://images.squarespace-cdn.com/content/v1/67d7f27d5965880d96f589a8/1351a05c-400a-4f71-bd73-d97bb1a66233/IMG_3235+2.jpg",
  "url": "https://deejahdishes.com/recipes/best-black-bean-brownies",
  "prepTime": "PT60M",
  "cookTime": "PT25M",
  "totalTime": "PT85M",
  "recipeYield": "12 brownies",
  "recipeCategory": "Dessert",
  "recipeCuisine": "American",
  "keywords": "Black Bean Brownies, High-Fibre Brownies, Fudgy Black Bean Brownies, Hidden Veggie Dessert, Easy Brownies Recipe, Healthy Chocolate Dessert, Healthy brownies, High-Protein Dessert",
  "author": {
    "@type": "Person",
    "name": "Khadijah"
  },
  "recipeIngredient": [
    "60g self-raising flour",
    "30g cocoa powder",
    "75g date paste (or 105g homemade blended dates + 1 tbsp water)",
    "1 tsp molasses (optional, for depth)",
    "50g granulated sugar",
    "1 large egg + 1 egg yolk (at room temperature)",
    "70g unsalted browned butter",
    "35g neutral oil (vegetable, sunflower, or avocado oil)",
    "1 can (226g) black beans, drained and rinsed thoroughly",
    "¼ tsp fine sea salt",
    "½ tsp espresso powder (optional, enhances chocolate flavor)",
    "¼ tsp ground cinnamon",
    "200g high-quality milk chocolate (chopped, for melting)",
    "1 tsp pure vanilla extract",
    "50g chocolate chips (for folding in + topping)",
    "Flaky sea salt (for garnish, optional)"
  ],
  "recipeInstructions": [
    {
      "@type": "HowToStep",
      "text": "In a food processor, combine drained black beans, date paste, molasses (if using), espresso powder, salt, and cinnamon. Blend until ultra-smooth, scraping down sides as needed. Add water 1 tsp at a time only if necessary to blend (mixture should be thick but creamy)."
    },
    {
      "@type": "HowToStep",
      "text": "In a light-colored saucepan, melt butter over medium heat. Swirl constantly until it foams, turns golden amber, and releases a nutty aroma (about 5 mins). Immediately transfer to a heatproof bowl to stop cooking. Let cool 10 mins (should be warm but not hot)."
    },
    {
      "@type": "HowToStep",
      "text": "In a microwave-safe bowl, heat chopped chocolate in 20-sec bursts, stirring between each, until 90% melted. Residual heat will melt the rest. Stir in browned butter and neutral oil until glossy."
    },
    {
      "@type": "HowToStep",
      "text": "In a large bowl, vigorously whisk eggs and sugar by hand for 3 full minutes until pale, thick, and ribbony (this creates a crackly crust)."
    },
    {
      "@type": "HowToStep",
      "text": "Gently fold chocolate mixture into eggs with a spatula until just combined. Then fold in blended bean mixture until uniform (batter will be thick and shiny)."
    },
    {
      "@type": "HowToStep",
      "text": "Sift flour and cocoa powder directly into the batter. Fold gently until no dry streaks remain. Stir in chocolate chips (reserve some for topping)."
    },
    {
      "@type": "HowToStep",
      "text": "Pour batter into a parchment-lined 8x8-inch pan. Top with reserved chips and flaky salt. Chill uncovered for 30 mins (hydrates flour and intensifies flavor)."
    },
    {
      "@type": "HowToStep",
      "text": "Preheat oven to 175°C (350°F). Bake for 22-25 mins until edges are set but center still jiggles slightly (a toothpick should have moist crumbs)."
    },
    {
      "@type": "HowToStep",
      "text": "Let cool 30 mins in pan, then transfer to fridge for 1 hour before slicing (ensures clean cuts and fudgy texture). Serve slightly chilled for maximum decadence."
    }
  ]
}
</script>