Brown Butter Biscoff Cinnamon Rolls

These cinnamon rolls are soft, gooey, and packed with rich caramelised flavours from the brown butter and Biscoff. They’re relatively small-batch (so you won’t have a mountain of them), but still taste like they came straight from a fancy Parisian bakery.
This recipe is designed for beginners. If you’ve never worked with yeast, dough, or homemade bread before, I promise you this: you can do this. I’m giving you every detail, the science behind why we do things, the exact textures to look for, and the mistakes I’ve made so you don’t have to.
By the end, you’ll have pillowy-soft, rich, caramelised cinnamon rolls with swirls of cinnamon, brown butter, and Biscoff. Let’s get baking.
Ingredients (makes 8-10 rolls)
For the Dough:
200g plain flour (For tenderness and structure)
80g bread flour (For chewiness and gluten strength)
30g ice-cold water (Slows down yeast activity for better flavour development)
2 eggs (Adds moisture, richness, and helps with structure)
½ teaspoon instant yeast (What makes the dough rise)
35g granulated sugar (Feeds the yeast and adds slight sweetness)
¾ teaspoon salt (Balances flavour, strengthens gluten)
80g whole milk (Hydration and softness)
100g unsalted butter (We’ll be browning this so a good amount will evaporate off, final weight could be around 80g)
For the Tangzhong:
20g bread flour
30g water
55g whole milk
For the Cinnamon Filling:
50g brown sugar OR 50g white sugar and 1 teaspoon of molasses (Adds caramel-like depth; just white sugar won’t cut it!)
1 teaspoon Biscoff biscuit spread (For a subtle spiced caramel flavour)
1½ tablespoons ground cinnamon (The star of the show, use fresh cinnamon for best flavour)
2 pinches of salt (Enhances all the flavours)
85g unsalted butter, at room temperature (For spreading into the dough)
For the Icing:
100g cream cheese, room temperature
80g powdered sugar, sifted
1 teaspoon vanilla extract
1 teaspoon lemon juice (Balances the sweetness)
40g softened unsalted butter
Sprinkle of salt (Enhances flavour)
Step-by-Step Instructions
Step 1: Making the Browned Butter
This is the very first thing you need to do because browned butter needs time to cool and solidify before we can mix it into the dough.
When butter is melted and heated past a certain point, its milk solids caramelise, creating a rich, nutty flavour that makes everything ten times more delicious (in my opinion).
Get a light-coloured pan or metal saucepan. The browning happens fast, so a dark pan makes it harder to see the colour change. A light pan lets you see that process properly.
Add the butter to the pan and melt it over medium low heat. Stir it constantly with a heatproof spatula or whisk to ensure even melting.
The butter will start foaming and bubbling. This is normal, it’s just the water content evaporating.

4. Watch for colour changes.
First, the butter will look yellow and clear.
Then, it’ll turn golden. (Image shown is at this “golden” stage, you can see at the sides how the milk solids are browning up)
Finally, you’ll see small brown specks forming at the bottom and those are the milk solids caramelising.
5. Immediately remove it from the heat once it reaches a deep golden brown (not dark browny-black, that probably means it’s burnt).
6. Pour the browned butter into a heatproof bowl and let it cool at room temperature for 15-20 minutes, then put it in the fridge or freezer until it solidifies to a soft butter consistency.
Step 2: Making the Tangzhong
This is a really good technique from East Asian baking that makes cinnamon rolls softer, fluffier, and more moist. Tangzhong (湯種) is a type of cooked flour paste that helps bread stay super-soft for longer. By pre-cooking a small amount of flour with liquid, the starches gelatinise and it allows the dough to absorb and retain more moisture without feeling too heavy or dense.
Get a small saucepan (preferably nonstick for easy cleanup).
Add the flour, water, and milk to the pan. Don’t add heat yet, whisk everything together until smooth and lump-free.
Turn the heat to medium low and start stirring continuously. The mixture will slowly thicken. Don’t stop stirring!
After about 1-2 minutes, you’ll see it transform into a thick, pudding-like paste.
Remove from heat immediately and transfer to a bowl to cool. Let it cool to room temperature before using.
Step 3: The Shaggy Dough Phase
At this stage, we're just hydrating the flour, waking up the yeast, and starting gluten development. Your dough will be wet and messy, concerningly so, but this is exactly what we want.
Mixing the Dough: Hand vs. Mixer
It’s possible to homogenise this dough by hand, but definitely prepare for a workout. The dough will stick to everything: your hands, your bowl, your soul. Just keep going, it’ll strengthen and smooth out. Eventually. I do strongly recommend using a machine for this recipe though.
Using a hand mixer with a dough hook attachment or stand mixer is easier. The dough hooks will do the hard work for you, but you still need to keep an eye on texture.
In a large mixing bowl, combine:
200g plain flour
80g bread flour
30g ice-cold water
Cooled tangzhong (all of it)
2 eggs
½ teaspoon insant yeast
80g whole milk
If Mixing by Hand: Use a danish dough whisk and stir until there are no dry spots. Then, use your hands to mash everything together into one messy dough ball. It will feel very sticky and loose, which is normal. Cover your hands in a tiny bit of oil or flour if needed, but don’t add extra flour to the dough itself (it’ll ruin the texture). Mix pretty vigorously for about 15 minutes.
If Mixing with a Hand Mixer: Attach dough hooks and mix on low speed for 2-3 minutes until everything is combined into a rough dough. Then increase to medium speed for 8-10 minutes, until the dough starts forming a slightly more elastic shape.
Once your dough looks well-mixed but still very soft and sticky, cover the bowl with a damp towel and let it rest for 10 minutes. This allows the flour to fully hydrate and makes kneading easier in the next step.

Step 4: The Browned Butter Phase
Now, we're enriching the dough, which means adding the browned butter, sugar, and salt. This step transforms it from a sticky mess into a smooth, elastic dough.
If you dump the butter in too early, it coats the flour and prevents proper gluten formation, making your dough weak and dense. By adding it after initial kneading, it ensures the dough is strong enough to support the fat.
Add the fully cooled, solidified browned butter to your dough.
If Kneading by Hand: Work the butter in a little at a time, squishing it into the dough. It will feel slippery and kinda weird at first, but keep kneading for 10-15 minutes. Eventually, it will fully absorb, and your dough will start feeling smooth and elastic.
If Using a Hand Mixer: Mix on medium speed for 8-10 minutes until fully incorporated. The dough should pull away from the sides of the bowl slightly but still be soft and tacky.
Once the butter is fully mixed in, add:
35g granulated sugar
¾ teaspoon salt
Knead for another 15 minutes until the sugar and salt are fully dissolved into the dough. You should no longer see any visible grains of sugar or streaks of butter.

Step 5: Stretching The Dough
Now, time for the slap & fold technique.
Pick up the dough, stretch it high and slap it against the bowl and fold it over itself.
Repeat about 15 times, this helps develop structure and make it less sticky.
Oil a clean bowl and place the dough inside. Cover with plastic wrap or a lid and refrigerate for at least 12 hours (overnight).

Step 6: Making the Cinnamon-Biscoff Filling
In a bowl, mix together the butter, biscoff spread, and molasses until smooth and creamy.
Add in the sugar, cinnamon, vanilla, and salt. Stir vigorously with a whisk until the mixture looks lighter in colour and fluffy. The sugar doesn’t need to fully dissolve, but the mixture should be well incorporated.

3. Taste it! If you want it more cinnamon-heavy, add more. If you want it sweeter, add a bit more sugar. Adjust to your liking.
Step 5: Rolling Out the Dough
Your dough has been chilling overnight, which means it should be firmer and easier to handle. Now, we’re going to roll it out, fill it with the cinnamon-biscoff mixture, and get it ready for shaping.
When you take it out of the fridge, it might not look like it doubled in size. That’s okay!! Cold dough rises slower, but the structure is still there. It’ll also probably feel firmer than yesterday, which is a good thing. Cold, hard-ish dough = easier rolling. But work quickly. As it warms up, it’ll become softer and harder to handle.
Take the dough out of the fridge and place it on your floured surface. Gently press down in the centre with your hands to start flattening it.
Flour your rolling pin and begin rolling it out into a rectangle, about 25-30cm wide and 20cm tall (10-12 inches x 8 inches).
Want extra swirls in your rolls? Roll it thinner (around 1.5cm thick).
Want fluffier, taller rolls? Keep it closer to 2-3cm thick.
Spreading the Filling
Spread the filling all over the rolled-out dough using an offset spatula or butter knife, leaving about 1cm (½ inch) border on all sides.
If you’re a cinnamon fiend (like me), go ahead and sprinkle a little more cinnamon on top.
Don’t overfill. If you use too much, the filling will leak out when rolling.

Step 6: Rolling & Cutting the Cinnamon Rolls
This is where we turn our cinnamon-covered dough slab into perfect golden spirals.
Rolling It Up
Start rolling from the longer edge (the 25-30cm side).
Roll tightly but gently, keeping an even pressure as you go.
Once you reach the end, pinch the seam closed to prevent it from unrolling.
If your dough feels too soft or sticky, pop it in the fridge for 10 minutes before cutting.
Cutting the Rolls (USING THREAD, NOT A KNIFE!)
A (blunt) knife presses down on the dough, squashing the layers and ruining the spiral, while thread (or string, twine, whatever) gently slices through, keeping the shape intact.
Take a long piece of thread, unflavoured dental floss, or kitchen twine.
Slide it under the rolled-up dough, about 5cm from the edge.

3. Cross the ends of the thread over the top and pull tight, it’ll slice cleanly through!
Repeat every 4-5cm until you have 6-8 evenly sized roll.
Step 7: Proofing the Rolls (Final Rise)
At this stage, the rolls need one final proof (rise) to get fluffy and light before baking.
Arrange the rolls in a metal baking pan lined with parchment paper. Metal conducts heat much better than materials like glass or ceramic, which helps with an even bake.

Place each roll 1–1.5 inches apart. They should have some room to expand but still touch slightly when they rise.
2. Create a warm, humid proofing environment by either:
Option 1 (Quick Method): Preheat your oven to 50°C (120°F) for 2-3 minutes, then turn it off. Open the door for a minute to release excess heat, then place the rolls inside with the oven light on.
Option 2 (Room Temperature Proofing): Cover the rolls loosely with cling film and let them sit in a warm place for 30–60 minutes until they puff up noticeably.

How to know when they’re ready to bake
The rolls should be visibly larger, with the edges touching each other.
When you poke one gently, it should slowly spring back but leave a small indentation, this means the gluten is relaxed and ready for baking.
If the dough bounces back immediately, it needs more proofing time. If it deflates when poked, it’s over-proofed - bake it immediately!
Step 8: Baking & Frosting (The Grand Finale!)
Finally, it’s time to bake these glorious, gooey cinnamon rolls and slather them in rich cream cheese icing.
Baking the Cinnamon Rolls
Preheat your oven to 160°C (320°F). We’re starting with a lower temperature to ensure an even bake.
Cover the rolls loosely with foil (a “foil dome”) and bake for 15 minutes. This prevents the tops from browning too fast before the centres are fully cooked.
Increase the temperature to 180°C (356°F) and bake for another 20 minutes. Remove the foil dome for the last 10 minutes to get a golden brown top.

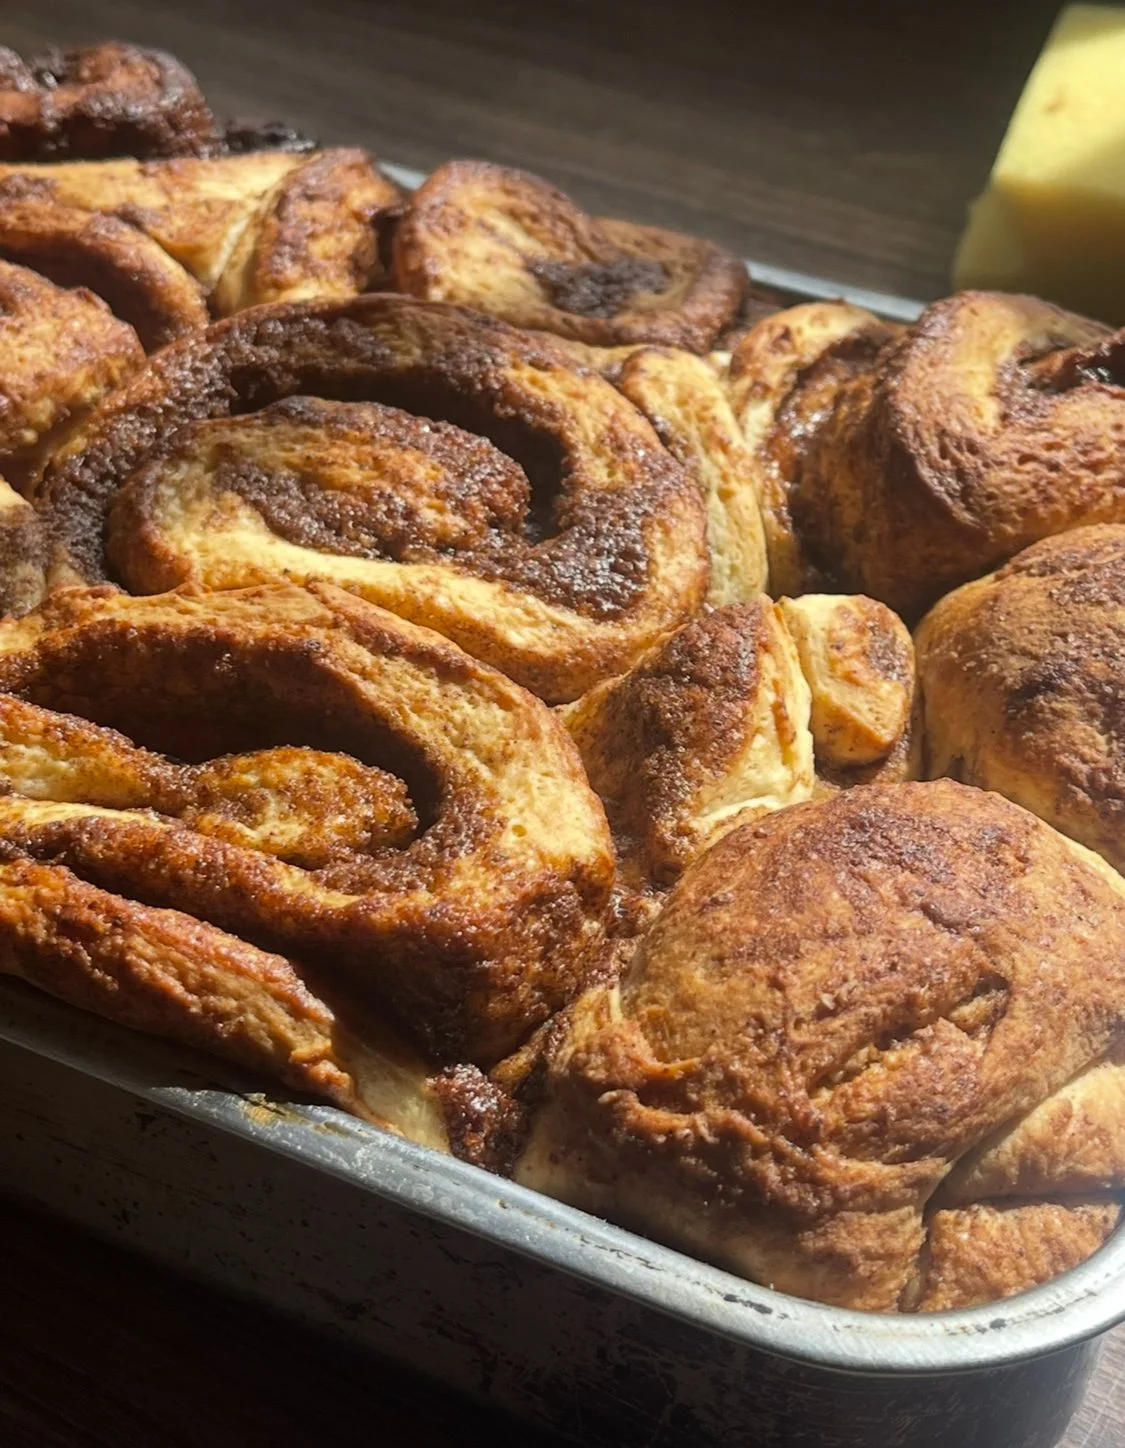
Check for doneness. The rolls should be puffed up, golden, and sound slightly hollow when tapped. (These are admittedly a little too brown, but I like the IKEA cinnamon roll look of it.)
Let the rolls cool in the pan for 10 minutes before icing.
Making the Cream Cheese Icing
This icing is tangy, rich, and smooth, the perfect contrast to the sweet cinnamon filling.
In a mixing bowl, cream together 40g softened butter and 80g sifted powdered sugar.
Once light and creamy, add:
100g softened cream cheese (cool to the touch, not melted)
1 tsp vanilla extract (or vanilla bean paste for extra flavour)
1 tsp lemon juice
A small pinch of salt
Mix until smooth, thick, and spreadable.

Spread the icing over the warm (not hot) cinnamon rolls. It should melt slightly and settle into the swirls.
<script type="application/ld+json">
{
  "@context": "https://schema.org/",
  "@type": "Recipe",
  "name": "Brown Butter Biscoff Cinnamon Rolls (Soft, Gooey & Irresistible!)",
  "description": "These small-batch cinnamon rolls are soft, gooey, and packed with rich caramelised flavours from brown butter and Biscoff. Perfect for beginners with detailed instructions for bakery-quality results.",
  "image": "https://images.squarespace-cdn.com/content/v1/67d7f27d5965880d96f589a8/1743174660268-PECR5AFML0JEOQNQYZGJ/IMG_3889.JPG",
  "url": "https://deejahdishes.com/recipes/brownbutterbiscoffcinnamonrolls",
  "prepTime": "PT2H45M",
  "cookTime": "PT35M",
  "totalTime": "PT14H20M",
  "recipeYield": "8-10 rolls",
  "recipeCategory": "Dessert, Breakfast, Brunch",
  "recipeCuisine": "American",
  "keywords": "brown butter cinnamon rolls, biscoff cinnamon rolls, small batch cinnamon rolls, overnight cinnamon rolls, easy homemade cinnamon rolls, best cinnamon roll recipe, gooey cinnamon rolls, tangzhong cinnamon rolls, holiday morning treats, weekend baking project, best cinnamon rolls, bakery-style cinnamon rolls, homemade cinnamon rolls, cinnamon roll with cream cheese frosting, brown sugar cinnamon rolls, cinnamon rolls for beginners, brown butter dessert recipes",
  "author": {
    "@type": "Person",
    "name": "Khadijah"
  },
  "recipeIngredient": [
    "For the Dough:",
    "200g plain flour",
    "80g bread flour",
    "30g ice-cold water",
    "2 eggs",
    "½ tsp instant yeast",
    "35g granulated sugar",
    "¾ tsp salt",
    "80g whole milk",
    "100g unsalted butter (browned)",
    "For the Tangzhong:",
    "20g bread flour",
    "30g water",
    "60g whole milk",
    "For the Filling:",
    "50g brown sugar (or white sugar + 1 tsp molasses)",
    "1 tsp Biscoff spread",
    "1½ tbsp ground cinnamon",
    "½ tsp salt",
    "85g softened unsalted butter",
    "For the Icing:",
    "100g cream cheese",
    "80g powdered sugar",
    "1 tsp vanilla extract",
    "1 tsp lemon juice",
    "40g softened butter",
    "Pinch of salt"
  ],
  "recipeInstructions": [
    {
      "@type": "HowToStep",
      "name": "Brown the Butter",
      "text": "Cut butter into cubes and melt in a light-colored saucepan over medium heat. Swirl constantly as it foams. Watch for amber color and nutty aroma (about 5-7 minutes). Immediately pour into a heatproof bowl, scraping all browned bits. Cool at room temp 15 minutes, then refrigerate 30 minutes until semi-solid."
    },
    {
      "@type": "HowToStep",
      "name": "Prepare Tangzhong",
      "text": "In a small nonstick pan, whisk together bread flour, water and milk until smooth. Cook over medium-low heat, stirring constantly with a silicone spatula, until thickened to a pudding-like consistency (2-3 minutes). Transfer to a plate, press plastic wrap directly on surface, and cool to room temperature."
    },
    {
      "@type": "HowToStep",
      "name": "Mix Initial Dough",
      "text": "In a large bowl, combine plain flour, bread flour, ice water, cooled tangzhong, eggs, yeast and milk. Mix with a dough whisk until shaggy. Knead by hand (15 mins) or mixer with dough hook (10 mins) until cohesive but still sticky. Cover with damp towel, rest 10 minutes."
    },
    {
      "@type": "HowToStep",
      "name": "Incorporate Brown Butter",
      "text": "Add solidified brown butter in small pieces to dough. Knead by hand (15 mins) or mixer (10 mins) until fully absorbed. Add sugar and salt, knead 5 more minutes until smooth and elastic. Dough should pass windowpane test (stretch thin without tearing)."
    },
    {
      "@type": "HowToStep",
      "name": "Overnight Rise",
      "text": "Place dough in lightly oiled bowl, cover tightly with plastic wrap. Refrigerate for 12-14 hours. Dough will rise slowly and develop complex flavours."
    },
    {
      "@type": "HowToStep",
      "name": "Prepare Filling",
      "text": "Beat room-temperature butter with Biscoff spread until creamy. Add brown sugar, cinnamon and salt, mixing until light and fluffy. Set aside at room temperature for easy spreading."
    },
    {
      "@type": "HowToStep",
      "name": "Shape Rolls",
      "text": "On lightly floured surface, roll chilled dough to 30x40cm rectangle (12x16 inches). Spread filling evenly, leaving 1cm border. Roll tightly from long edge, sealing seam. Use unflavored dental floss to cut into 8-10 equal pieces (slide floss under, cross over top and pull)."
    },
    {
      "@type": "HowToStep",
      "name": "Final Proof",
      "text": "Arrange rolls in parchment-lined baking pan, spacing 2cm apart. Cover loosely with oiled plastic wrap. Proof in turned-off oven with light on for 1.5-2 hours until nearly doubled (should spring back slowly when gently poked)."
    },
    {
      "@type": "HowToStep",
      "name": "Bake to Perfection",
      "text": "Preheat oven to 160°C (320°F) with rack in center position. Bake rolls covered with foil for 15 minutes, then uncover and increase to 180°C (356°F) for 20 minutes until golden brown and internal temperature reaches 88-91°C (190-195°F)."
    },
    {
      "@type": "HowToStep",
      "name": "Finish with Frosting",
      "text": "Beat cream cheese with powdered sugar until smooth. Add vanilla, lemon juice and pinch of salt. Gradually incorporate softened butter until silky. Spread over warm (not hot) rolls. Serve immediately for gooey perfection."
    }
  ]
}
</script>
FAQ & Troubleshooting
Why do my cinnamon rolls separate?
It’s usually one of two things: either the dough wasn’t really rolled tightly enough, or the filling created too much of a slippery surface. When you spread the filling, make sure it’s an even layer, not too thick, not too greasy. And when rolling, start from the longest edge, keeping the roll snug but not so tight that you squeeze the filling out. Another culprit is not sealing the seam properly. You can pinch it closed or even brush a little water or egg wash along the edge before rolling to help it stick. And, of course, use thread, floss, or kitchen twine to cut them, not a knife. A knife presses down and squashes the delicate spiral, making it more prone to separating as it bakes.
Which flour can I use for cinnamon rolls? I don’t have bread flour.
Bread flour is great because it has a higher protein content, meaning it develops more gluten, which gives cinnamon rolls that soft, stretchy texture. But if you can’t get it, don’t panic, you can use all-purpose (plain) flour!Your rolls might have less structure and be a little softer and less chewy, but they’ll still be delicious.
Why do my cinnamon rolls leak?
Ugh, the dreaded filling melt-out. This happens when the butter gets too melty before the dough has a chance to set around it. One way to reduce this is by using the creaming method, whipping the butter and sugar together until light and fluffy. This helps the filling stay put instead of turning into molten sugar soup. Also, make sure your rolls aren’t too close together in the pan; if they have space to rise and bake properly, they won’t get squished and force the filling out.
Why do my cinnamon rolls taste yeasty?
Usually too much yeast. If you accidentally over-measured, your dough will ferment too aggressively, giving off that overpowering taste. Also, under-proofing or over-proofing. Under-proofed dough hasn’t had time to fully develop flavours, leaving a raw yeasty taste, while over-proofed dough has sat too long and developed a fermented, unpleasant sour note. Trust your dough more than the clock; it should be puffy and pass the “poke test” (a gentle press should spring back slowly).
Why are my cinnamon rolls hard?
Usually happens if too much flour was added, either during the initial mixing or while rolling out the dough. The dough should be slightly tacky but not sticky. If you keep dumping in flour because it feels “too wet,” you’re drying it out before it even has a chance. Over-baking is another culprit; these rolls need to be just about golden brown, not dark brown.
Why is this recipe soooo long? Can’t I just make these in one day?
I hear you, haha. You want instant gratification, and I respect that. But some things just take time, and good cinnamon rolls are one of them. The overnight cold proof does soooo much for both flavour and texture development, it lets the gluten develop slowly, makes the rolls easier to handle, and improves their structure. Could you do it all in one day? I guess technically, yes, if you proof the dough in a warm spot and expedite the process. Now will they taste as good…not even close.
What’s the point of the tangzhong? Do I really need it?
Is it absolutely essential? No, but it does make a noticeable difference in the texture and shelf life of the rolls. If you want ultra-pillowy cinnamon rolls that stay soft even the next day, don’t skip it.
Do you really need to brown the butter?
This recipe was designed to highlight all those toasted, caramelised flavours - which is exactly why I went heavier on the cinnamon, added Biscoff for extra depth, and gave it a long proofing time so everything could meld into a rich, autumnal treat. Brown butter plays a huge role in that. The golden, nutty milk solids add a depth that plain melted butter simply can’t replicate.
Help, my cinnamon rolls expanded too much after baking!
Yeah, been there, done that, got the weirdly puffy rolls to prove it.
If your rolls are basically cinnamon bread at this point, it’s likely that the dough was either too weak (not enough gluten structure) or too strong (over-proofed, meaning the yeast went crazy and kept expanding in the oven).
Also, baking them too long will dry them out and make them more prone to expanding unevenly. Next time, make sure you’re kneading thoroughly, spacing them out a little more, and keeping an eye on the proofing time. Oh, and don’t go overboard on thickness when rolling them out, a good swirl ratio is key.
Thank you so much for reading! If you have any questions at all — about this recipe, how to tweak it to your taste, or even just to chat about food — I’d love to hear from you. Drop a comment below, DM me, or send me an email anytime.
P.S. The blog image for the cinnamon rolls isn’t AI 😭 I noticed it had that AI “too shiny” look so I want to clarify: I will NEVER use AI for any of my food images EVER.